Mash-in temperature, mash pH, grist-to-water ratio, mixing method, temperature stages, and oxygen control — 8 diagrams and 5 data tables that turn mashing theory into brewhouse practice.
What separates a brewhouse that hits 82% extract with rock-solid flavor stability from one that struggles at 75%? Rarely is it a single dramatic mistake — it is the sum of small technical conditions. Mashing is a biochemical process, and everything you do around it should serve one goal: let the malt enzymes work at their maximum potential, so the wort reaches the quality and quantity you expect. Besides good crushing and the right mashing method, five conditions decide the outcome — quality raw materials, proper mash concentration and pH, precise mashing temperature, and strict anti-oxidation measures. How well is your brewhouse doing on each one?
1. Which Raw Materials and Enzyme Preparations Set the Foundation?
Why does the same mash program give different results in two breweries? Start with the malt. Malt varieties differ enormously, and those differences dictate how you control the mash. Proteolytic enzymes in malt begin activating at about 35 °C, while beta-glucanase is far more heat-sensitive — so if your malt is poorly modified or contains too much beta-glucan, what should you do? Mashing-in low (35–40 °C) gives the gum-breaking and protein-degrading enzymes time to work before heat destroys them. Only with well-modified, enzyme-rich malt can you risk skipping the low-temperature phases and mashing in at around 50 °C. Ask yourself honestly: do you know the modification degree of the malt in your silo this week?
What if your malt simply cannot deliver enough enzyme power? Enzyme preparations are now widely used in commercial brewing. A common practice is high-temperature mashing-in (around 62 °C) supported by added enzymes. Why is this attractive? The mash time is shorter and energy consumption drops — and because the mash spends less time in the oxidation-prone low-temperature zones, foam stability and flavor stability actually improve. Isn’t that a rare case of faster, cheaper, and better at the same time?
2. How Does Mash-In Temperature Shape Your Beer?
Can one number at mash-in really echo all the way into the packaged beer? It can. When breweries mash in high (around 62 °C), the technical features stack up in your favor:
- Shorter mash, lower energy: the mash reaches saccharification temperature quickly and spends less total time in the tun.
- More high-molecular nitrogen: protein breakdown is limited, which — surprisingly — benefits foam.
- Better foam stability: foam-active, higher-molecular proteins survive to carry the head.
- Lower free amino nitrogen (FAN): fewer amino acids are available to participate in Maillard and aging reactions.
- Fewer amino acids in Maillard reactions: the direct chemical driver behind lower stale flavor formation.
And what does the data say about staling? The relationship is remarkably clear: the higher the mash-in temperature, the lower the aging compounds measured in the finished beer.
How big is the difference between a 35 °C and a 62 °C mash-in?
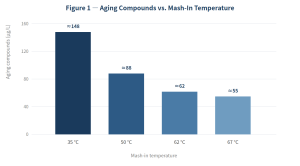
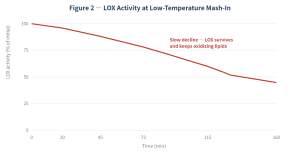
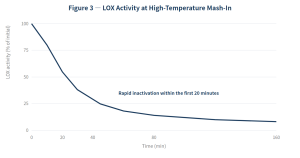
Why does a hotter mash-in protect flavor? One key player is lipoxidase (LOX) — the enzyme that attacks lipids and builds carbonyl staling precursors. At a low mash-in temperature LOX stays active much longer; at a high mash-in temperature it is destroyed within minutes. Compare the two curves below — which one describes your current process?
What happens to LOX when you mash in low?
And when you mash in at 62 °C instead?
2.1 Does Mash-In Temperature Also Decide Foam Quality?
Foam is the other side of the same coin. Under normal conditions, a higher mash-in temperature improves head retention — most likely because a measurable fraction of high-molecular nitrogen survives. Foam-active proteins of a specific molecular weight (around 4,100 Da) build the foam skeleton, while the tannin-active proteins that destroy foam increase markedly only above 60 °C. So where does your recipe sit?
Table 1 — Mash-In Temperature vs. Foam Stability
| Mash-in temperature (°C) |
Foam stability (as printed in the source table) |
| 10 |
Relatively good |
| 50 |
Poor |
Table reproduced as printed in the original text; treat the relationship as data-point-level evidence rather than a linear rule — foam outcome always interacts with malt modification and high-molecular nitrogen.
Want the full picture of what each mash-in temperature level buys you — and what it costs?
Table 2 — Mash-In Temperature vs. Process Targets
| Target / component |
Mash-in 37 °C |
Mash-in 50 °C |
Mash-in 62 °C |
Linked beer quality |
| Amino nitrogen (FAN) |
++ |
+ |
– |
Yeast nutrition |
| High-molecular nitrogen |
+ |
– |
– |
Foam stability |
| Final fermentability |
(+) |
(+) |
(+) |
Attenuation |
| Side reactions (Maillard) |
+ |
+ |
+ |
Stale flavor load |
| Beta-glucan breakdown |
++ |
+ |
– |
Filtration performance |
| Foam stability |
(+) |
(+) |
(+) |
Foam, mouthfeel |
Symbolic intensities restored from the original table (partially blurred in the source photo) — approximate reconstruction.
Brewing tip: Using well-modified malt? A 58–62 °C mash-in trades a little yeast nutrition for noticeably better flavor stability and foam. Running under-modified malt or high-adjunct grists? Protect your enzymes first — mash in at 35–40 °C and climb step by step. Which trade-off fits your beer style this month?
3. Why Do Mash Concentration and pH Deserve So Much Attention?
How much water should meet how much grist? The grist-to-water ratio directly decides your first-wort gravity: mashing in with 100 kg of malt and about 300 kg of mashing water yields a first wort of roughly 20 °P. In practice, the cereal cooker runs a thick mash at around 1 : 3.5 — thick mashes protect heat-sensitive enzymes and favor protein breakdown — while the mash tun runs thinner at around 1 : 5.0, because a thin mash favors starch gelatinization and liquefaction. Are you controlling both vessels differently, or treating them the same?
Concentration matters to enzymes, too. In a concentrated mash the enzymes — especially the protein-degrading ones — are measurably more stable, and the mash pH optimum sits around 5.4–5.6. But be careful in the other direction: when first-wort gravity climbs too high, fermentability and conversion efficiency suffer. Where is your ceiling? Most plants keep pale-beer first wort at about 16 °P, while dark and strong beers push to 18–20 °P.
Table 3 — Wort Gravity Control by Beer Type
| Beer type |
First wort gravity (°P) |
Final wort gravity (°P) |
Difference (°P) |
| Pale beer |
14–16 |
12 |
2–4 |
| Dark beer |
18–20 |
12 |
6–8 |
3.1 How Can You Adjust Mash pH — and What Do You Gain?
What are the practical levers? Brewers typically combine:
- Water treatment: gypsum or calcium chloride addition, or food-grade acid dosing (detailed in water-treatment chapters).
- Lactic acid malt: adding 1–2% of specialty acidulated malt to the grist.
- Biological acidification: acidifying part of the mash with lactic acid bacteria, then blending it back before saccharification.
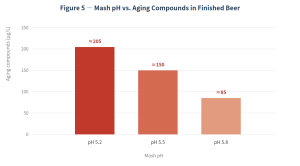
And why bother? Because lowering mash pH toward the enzyme optimum touches nearly every quality attribute at once:
- Faster conversion: amylases split starch quicker and more completely, raising extract yield.
- Better protein separation: enhanced protein and gum breakdown improves wort clarity and colloidal stability.
- Lighter color: fewer polyphenols are extracted, so wort color drops and the taste turns softer.
- Faster filtration: beta-glucan breakdown improves, aiding lautering, foam stability and head retention.
- Healthier fermentation: yeast grows vigorously with faster primary and secondary fermentation.
- More available zinc: the medium carries more zinc — vital for yeast protein synthesis, proliferation and fermentation.
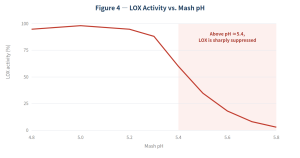
- Less lipid oxidation: LOX activity falls, directly lifting flavor stability.
How sharply does pH actually switch LOX off?
Does that pH shift show up in the aged beer, too?
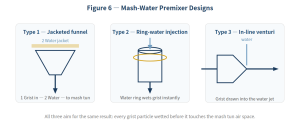
4. What Is the Best Way to Mix Grist and Water?
Does it matter how the two meet? More than most brewers assume. In the traditional method, tempered water is filled into the mash tun first, the agitator is started, and the grist is metered in from the hopper — yet when grist falls through the air space above the surface and sinks through the water zone, it drags oxygen down with it. Water can also be pre-blended with the grist in a dedicated mash-water premixer, so the slurry enters the tun already uniform and clump-free. Which of the three classic premixer designs fits your brewhouse layout?
5. Which Mashing Temperature Stages Matter Most?
Why do brewers raise temperature step by step instead of jumping straight to 78 °C? To protect the enzymes: each stage has its own job, and heat that arrives too early destroys enzymes that still had work to do. The two tables below are the classic control map — how many of these stages does your current program actually use deliberately?
Table 4 — Mashing Temperature Stages and Their Effects
| Temperature (°C) |
Enzyme / process effect |
| 35–40 |
Enzymes dissolve and become active; beta-glucan breakdown begins (foundation for later filtration) |
| 40–45 |
Protein-degrading enzymes intensify; soluble nitrogen starts forming |
| 45–52 |
Optimal protein-rest window; substantial formation of high-molecular nitrogen compounds |
| 50 |
Favors lower-molecular protein degradation products (yeast-nutrition nitrogen) |
| 53 |
Beta-glucan breakdown well supported; formation of high-molecular nitrogen decreases |
| 53–62 |
Protein degradation continues; free amino acids accumulate |
| 63–65 |
Large amounts of maltose are generated (beta-amylase optimum) |
| 65–70 |
Alpha-amylase strengthens; dextrins and fermentable sugars form in parallel |
| 70–75 |
Alpha-amylase optimum; short-chain dextrins are converted into fermentable material |
| 75–78 |
Dextrinization stage: alpha-amylase finishes residual dextrins, other enzymes are inactivated, fermentable-sugar gain drops |
| 80–85 |
Only the most heat-tolerant enzymes still act; extract gain is small while enzymes rapidly die off |
| 85–100 |
Enzyme destruction |
Restored from the original table; some cells partially blurred in the source photo.
Table 5 — The Four Control Stages of the Mashing Temperature Profile
| Stage |
Range (°C) |
What happens |
Control tips |
| Enzyme dissolution (steeping) |
35–40 |
Enzymes dissolve and start work; beta-glucan breakdown begins |
Choose for under-modified or high-beta-glucan grists |
| Protein rest |
45–55 |
Peak protein degradation; balance of FAN and foam-active high-molecular nitrogen |
45–52 °C favors FAN; length depends on malt modification — under-modified malt needs the longest rest |
| Saccharification |
62–70 |
Maltose formation peaks at 62–65 °C; 65–70 °C shifts toward dextrins |
Hold until the iodine test is negative; adjust the 62–65 vs. 65–70 split by target fermentability |
| Dextrinization (mash-out) |
75–78 |
Alpha-amylase clears residual dextrins; all other enzymes are inactivated |
Heat promptly to ~78 °C to stop the enzyme profile exactly where you designed it |
Control details restored from the original table; partially blurred cells reconstructed from standard brewing practice.
6. How Do You Keep Oxygen Out of the Mash?
How much oxygen does a mash actually absorb? Far more than most brewers imagine — and the total depends on mashing technology, grist fineness, how full the vessel is, and how much air the headspace exchanges. What does that oxygen do? It oxidizes polyphenols and lipids, slows the mash, damages foam and flavor stability, and leaves fewer taste-stable compounds in the beer. Can you name every place air sneaks into your mash? The five classic offenders are:
- Adding mash or grist from the top of the vessel — falling material carries air down with it.
- Excessively high transfer velocity during mashing-in and mash transfer.
- Pumping the mash through pumps and lines that are not fully flooded.
- Cavitation when casting or transferring mash — vortices suck air straight into the liquid.
- Ventilation during mashing — unnecessary air movement that also damages enzymes.
So what does an oxygen-conscious brewhouse look like?
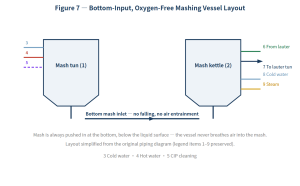
Beyond pipework, what daily habits keep oxygen out? The classic five measures:
- Install a mash-water premixer so grist is wetted the instant it meets water.
- Use bottom mash inlets (Figure 7) — never let mash fall through air.
- Switch to variable-frequency (VFD) stirring. Modern tuns no longer stir violently; the motor speed is matched to the vessel. During decoction pumping, stop the agitator for 5–10 minutes so undissolved grist settles at the vessel bottom, then restir gently at medium speed for about 3 minutes after recombining.
- Avoid cavitation when casting mash — keep lines flooded and vortexes broken.
- Mash under inert gas. Nitrogen-blanketed mashing removes air from the equation entirely.
And does it actually work? Look at what the beer remembers.
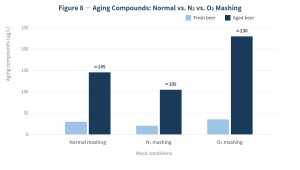
Brewing tip: If you change only one thing after reading this guide, make it bottom inlet mashing with a premixer. It costs far less than a new brewhouse — and the flavor-stability data in Figure 8 suggests it is worth more than most new equipment.
Veelgestelde vragen
What mash-in temperature should I choose for my malt?
Let malt modification decide. Under-modified or high-beta-glucan malts need a low start (35–40 °C) so proteases and beta-glucanase can work. Well-modified malt tolerates 50 °C, and with enzyme preparations a 58–62 °C mash-in shortens the process while improving foam and flavor stability.
Which mash pH should I target — and how do I reach it?
Aim for roughly pH 5.4–5.6. Reach it with water treatment (gypsum, calcium chloride, acid dosing), 1–2% acidulated malt, or biological acidification of part of the mash. The payoff list is long: higher extract, better filtration, lighter color, healthier yeast, and measurably lower lipid oxidation.
What grist-to-water ratio should my brewhouse run?
Run the cereal cooker thick at about 1:3.5 to protect enzymes and favor protein breakdown, and the mash tun thinner at about 1:5.0 to favor starch gelatinization and liquefaction. Keep pale-beer first wort near 16 °P; only dark or strong beers should push first wort to 18–20 °P.
How can I tell if oxygen is damaging my wort quality?
Watch for the symptoms: sluggish conversion, darker-than-planned wort color, harsher bitterness, and beer that stales within weeks. Then audit your process against the five oxygen entry points — top addition, high transfer speed, pumping, cavitation when casting, and ventilation during mashing.
Do I really need nitrogen mashing?
Not every brewery does. If your beer ships fast and cold, bottom-inlet mashing with a premixer and disciplined VFD stirring may be enough. But for brands competing on fresh flavor after long logistics chains, nitrogen-blanketed mashing is one of the cheapest flavor-stability upgrades available.
Conclusion: So Which Condition Will You Fix First?
Mashing quality is never an accident — it is the sum of controlled conditions: raw materials matched to your enzyme plan, a mash-in temperature chosen for flavor stability rather than habit, concentration and pH managed vessel by vessel, mixing that does not beat air into the grist, temperature stages held precisely, and oxygen kept out at every transfer. Each condition is simple. Together, they decide whether your beer tastes the same — and sells the same — six months from now.
Where is your biggest gap? Pull out your last brew log and score yourself against the five conditions in this guide. The weakest one is almost always where the money is hiding.


 Gepubliceerd